September marks the start of autumn in the English garden, a time when the last of summer’s warmth meets the cooler breezes of autumn. It’s a crucial month for both enjoying the beauty of late blooms and preparing for the coming months. From harvesting crops to planting for next year, here are some key tasks to keep your garden looking its best in September.
Harvest the Last of Summer Crops
By September, many fruits and vegetables are ready for harvesting. Courgettes, beans, and sweetcorn will be ripening, while fruits like apples, pears, and plums are also reaching their peak.
Practical Tip: Pick fruits and vegetables as soon as they ripen to encourage the plants to keep producing for as long as possible. If frost is forecast, harvest any remaining tender crops like tomatoes and courgettes, as even a light frost can damage them.
Sow Hardy Vegetables for Winter
It’s not too late to sow hardy vegetables that will provide fresh produce over the winter months. Spinach, kale, and winter lettuce can be sown in September, and with a little protection from frost, they’ll provide fresh greens well into winter.
Practical Tip: Use cloches, fleece, or cold frames to protect these crops from colder weather. If you’re growing them in pots, consider moving them to a sheltered location, such as a greenhouse, as temperatures drop.
Divide Perennials
September is the ideal time to divide and transplant herbaceous perennials like hostas, daylilies, and asters. Dividing perennials rejuvenates the plants, encourages healthy growth, and provides extra plants to fill gaps in your garden or share with friends.
Practical Tip: Lift the clumps of perennials carefully using a garden fork, and gently pull apart the roots into smaller sections, ensuring each section has a good portion of root and shoots. Replant them at the same depth they were originally growing and water them in well.
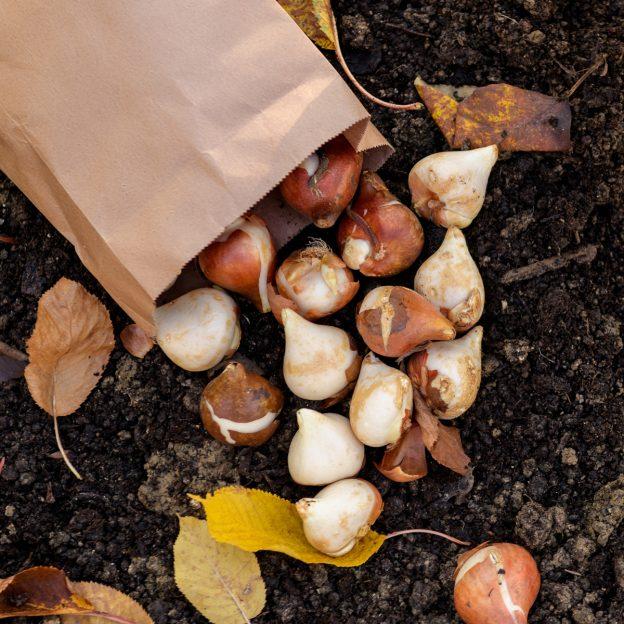
Plant Spring Bulbs
September marks the beginning of bulb-planting season. Start planting daffodils, crocuses, and other spring bulbs now so they can establish roots over the winter. If you wait too long, they won’t have enough time to settle before the cold weather sets in.
Practical Tip: Choose a sunny spot with well-drained soil. Plant bulbs at a depth roughly three times their height and space them out to allow for future growth. Make sure to plant with the pointed end facing up!
Deadhead Flowers
Many late-summer bloomers, such as dahlias, roses, and cosmos, will still be flowering in September. Deadheading—removing spent blooms—will encourage them to continue flowering for as long as possible.
Practical Tip: Use clean, sharp secateurs or scissors to cut off faded blooms, taking care not to damage surrounding buds. This will help your plants focus their energy on producing new flowers instead of seeds.
Lawn Care
With cooler weather and occasional rain, September is a good time to give your lawn some attention. You can scarify (rake out the thatch), aerate, and even overseed thin or bare patches. The soil is still warm enough for grass seed to germinate, but cool enough to prevent it from drying out too quickly.
Practical Tip: After aerating your lawn with a garden fork or aerator, spread a layer of lawn feed and grass seed over bare areas. Water the lawn thoroughly, especially if the weather remains dry, to help establish strong roots before winter.
Compost and Mulch
As you begin cutting back faded flowers and clearing vegetable beds, there will be plenty of plant material for composting. Fallen leaves and grass clippings can be added to your compost heap to break down over the coming months.
Practical Tip: To balance the nitrogen-rich “green” waste (like grass clippings), add some “brown” materials such as shredded cardboard or fallen leaves. This will help your compost decompose more efficiently and prevent it from becoming too wet.
Prepare for Frost
Although September is generally mild, frosts can occur later in the month. Prepare by bringing tender plants, such as pelargoniums and begonias, under cover. If you can’t bring plants indoors, consider covering them with horticultural fleece (available from our garden centre) on colder nights.
Practical Tip: Keep an eye on the weather forecast, and have some horticultural fleece or old sheets handy to protect plants in case of an unexpected frost. We sell fleece by the metre in our garden centre, near the tills.
Conclusion
September is a month of transition in the English garden, offering a mix of harvesting, planting, and tidying up. By taking care of tasks like dividing perennials, sowing hardy crops, and preparing for colder weather, you’ll set your garden up for success throughout the autumn and into next spring. Happy gardening!