Author Archives: Tammy Falloon

Re-potting plants in containers

We’re always being asked about re-potting plants growing in containers.

Most plants will grow perfectly well in a container, but the size of the container and the vigour or the plant will determine when and if it will need re-potting or eventually planting out in the garden.

Once the pot and compost become full of roots, plant growth will be reduced. Not always a bad thing but eventually this may lead to the plant looking sick or starting to loose its leaves. You’ll certainly need to pay more care and attention to watering and feeding. January is a good time to check over plants growing in containers, if they’ve become pot bound and the roots completely fill the pot it may be time to re-pot them into a larger pot or even plant them out in the garden.

If re-potting, go for a container just one or two sizes bigger than your existing container. Thoroughly water the plant, carefully remove it from the existing pot. If pot-bound, carefully tease out the main roots and then replant into the new container adding enough fresh compost and firming as you refill the pot. Make sure you replant at the same depth it was growing in the previous pot (i.e. the top layer of compost should only go to the existing soil line at the base of the plant stem you’ll therefore have more new compost under the plant).  Plants that are not yet pot pound, can remain in their existing pots for at least another year but they will benefit from top-dressing. Carefully scrape off the top inch or so of compost and replace it with fresh compost. For best results, add some controlled release fertiliser, available from our garden centres.

Weeding top tips

Weeding in your garden is never a fun job, you fundamentally have three choices: prevention, chemical aids (herbicides) or mechanical aids (hoeing) and like most things; prevention is better than cure!

By killing the weeds when they’re seedlings, you’ll ensure they never reach flowering size, so can never set seed and spread themselves even further. Alternatively we are fans of mulching the soil, by adding a mulch or soil covering of bark or similar material, that’s at least 2 inches but preferably 3 inches thick you prevent the weed seeds germinating in the first place. As an added bonus, a mulch will also insulate the roots from frost and cold weather as well as keeping the soil moist during periods of drought. When you’re planting new beds and borders, it’s a great idea to plant through a weed suppressing planting membrane. These are laid on previously prepared soil, the membrane is pulled tight and the edges buried in the soil. X-shaped slits are cut in the fabric to plant through. Once planting is complete, cover the membrane with a thin mulch of bark, gravel or other material to hide it.

The final method we like to use is employing ground cover plants. These are simply low growing plants that cover the soil preventing weed seed from germinating and competing with any that do grow. Good choices include hardy geraniums, periwinkle, aubrietia, hostas and ground cover roses. But there are dozens of other choices so ask our staff for advice when you visit one of our garden centres.

Post-Christmas Houseplant Doctor

We’ve had a lot of questions about looking after houseplants at this time of year, so here are our post-Christmas Houseplant Doctor suggestions…

Firstly you need to make sure the plants are in the right position, receiving the right amount of light and within the correct temperature range. Nearly all houseplants come with care labels that provide this kind of information, but if you’re still not sure just ask one of our plant staff or use our plant doctor enquiry form.

All plants will need watering as and when the compost starts to dry out, or as otherwise needed. Regular watering is the best approach, but make sure you don’t over do it, most houseplants die from being overwatered. Flowering houseplants should be dead-headed once the blooms begin to fade and given a weekly to fortnightly feed with a flowering houseplant fertiliser that we sell. Both will encourage further flushes of flower and so prolong flowering. Nearly all foliage houseplants need high humidity levels around their leaves, otherwise they develop brown edges. You can do this by daily hand misting, or better still, standing the pot in a saucer filled with damp pebbles or hortag. Just make sure that the bottom of the pot isn’t sitting in water as this will lead to the roots rotting.

Although it’s due to be too cold outside for most pests and diseases to be active, temperatures indoors are just right and in some places those outdoors are too! Keep a close eye on plants in the house, greenhouse or conservatory for whitefly, red spider mite, aphids, scale insects and mealybug. In the greenhouse and frames grey mould can be a problem, so keep watering to a minimum, avoid splashing water about and ventilate whenever the weather conditions allow.

Top Tips for adding colour this winter

Here are our top tips for adding extra colour to your garden this winter.

  1. Choose your planting sites carefully. Ensure new plants are positioned in full view from a window or prime position by patio doors so you can enjoy them every time you look outside on dull days.
  2. Add winter colour to your front garden to welcome you home and cheer-up your local neighbourhood.
  3. Fill patio pots and baskets with hardy winter bedding plants, like pansies and violas with cheerful faces in a kaleidoscope of colours.
  4. Buy pots of bulbs to create a carpet of colour under trees and shrubs. Whilst the time has passed to plant winter and early spring flowers from bulbs (make a note for this September) you can buy them now already growing in pots.  They’ll establish better from growing plants, look out for snowdrops among others.
  5. Plant clumps of winter flowering Iris unguicularis to brighten a dry, sunny spot at the base of a wall or fence, and use blooms as cut flowers to bring indoors.

OTHER FAVOURITE PLANTS OF THE MOMENT

Create striking winter displays by choosing some of the following for your planting combinations:

  • Aucuba varieties
  • Coronilla ‘Citrina’
  • Dogwoods (Cornus varieties)
  • Elaeagnus varieties
  • Garrya elliptica ‘James Roof’
  • Rosebud Cherry (Prunus x subhirtella ‘Autumnalis’)
  • Skimmia varieties
  • Sweet box (Sarcococca)
  • Winter Jasmine (Jasminum nudiflorum)

All the above are grown on our Exeter nursery and available to buy from our garden centres or by calling 01392 876281.

Creating a Winter Wonderland

Creating a Winter Wonderland is easy with our help. Add the wow factor to your winter garden with striking plants that look their best right now. Whether you like to fill your borders with hardy shrubs covered with fragrant flowers, clad a fence or archway with colour, or plant a small flowering tree to create a focal point, you’ll find a great range of seasonal stunners in our garden centres during January.

A choice selection of the very hardiest plants put on their best show in the depths of winter, providing a bright outlook from the comfort of your armchair, and an even warmer welcome when you step outside.

Gold blooms really shine out on gloomy days, so look out for dramatic Witch Hazels that produce clusters of small fragrant flowers with petals like dainty ribbons, transforming the otherwise naked stems of this hardy shrub.

Evergreen mahonias are equally impressive, with golden sprays of flowers forming at the tip of each shoot. There are several varieties to choose from with different sizes and forms, and flowers on most are followed by the formation of grape-like berries in spring, giving these shrubs their common name of Oregon Grape.

For great garden performance it’s always worth looking out for varieties that have been given the Award of Garden Merit (AGM) by the Royal Horticultural Society, and this is indicated by a trophy symbol on our plant bed labels.

In addition to their welcome colour, fragrance is another valuable characteristic of many winter flowering shrubs. For long-lasting displays it’s hard to beat varieties of Viburnum x bodnantense that produce a succession of flowers from October until spring.

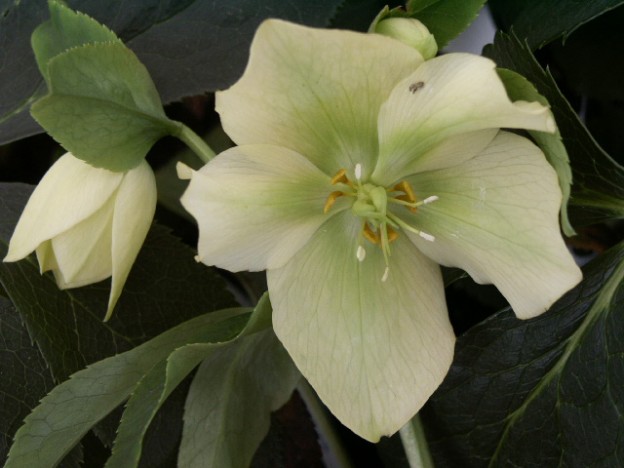
And for a shady site take a look at the Christmas Rose, Helleborus niger, a low-growing and compact perennial whose simple white cup-shaped flowers can be picked and floated on water in a glass bowl to provide seasonal table decorations.

Winter brings out the best in many plants. While flowers are an essential part of this seasonal spotlight, many other characteristics provide winter interest too. A wide range of conifers and evergreen shrubs provide bold forms and fancy foliage. Also look out for plants with colourful wand-like stems, dainty tassel-like catkins, and the tactile barks of many ornamental trees.

So don’t shut-up shop for winter, but welcome in the New Year in style with garden displays that provide colour, fragrance, foliage and form. Visit one of our Exeter based garden centres now to discover the best plants to create your very own winter wonderland!

OUR TOP FOUR PLANTS FOR WINTER FLOWERS

Witch Hazel (Hamamelis varieties)

Unusual fragrant flowers in clusters of tiny ribbons develop along the entire length of stems. Varieties we grow and sell are:

x intermedia Arnold Promise (AGM), Diane (AGM), Fire Cracker, Jelena (AGM), Pallida (AGM) and Hamamelis mollis (AGM)

Oregon Grape (Mahonia varieties)

Choose from a range of robust and reliable Mahonias to provide evergreen foliage and golden seasonal flower, followed by black grape-like berries in spring. Good AGM varieties include ‘Winter Sun’, ‘Apollo’ and ‘Lionel Fortesque’ among the four other varieties we grow.

Winter Flowering Viburnum (Viburnum x bodnantense)

A majestic shrub producing deliciously fragrant pink/white flowers.
Our favourite is Viburnum x bodnantense Dawn (AGM).

Christmas Rose (Helleborus niger)

This compact perennial is perfect for a slightly shady position, producing clusters of flowers through winter and into spring. Also look out for the three other wonderful Hellebore hybrids we grow that are available now.

Guide to fruit tree rootstocks

So you want to add fruit to your garden (who wouldn’t)? Growing fruit trees is relatively easy but five minutes planning before you order will pay dividends in the long run. Today’s blog is a Guide to fruit tree rootstocks.

The first thing you need to decide is how tall you want your fruit tree to be ultimately. This will determine what rootstock you require. All our fruit trees are produced by a process known as chip budding or grafting. This fundamentally allows us to produce trees that on their own root system may grow too big for today’s gardens. It also allows us to invigorate varieties that have weak growth on their own roots and it allows us to produce fruit trees that don’t come true from seed.

At St Bridget Nurseries we generally offer a semi vigorous rootstock and a dwarf rootstock for each fruit type.

APPLES

Apple rootstocks have very uninspiring names and sound more like motorways!

MM106 is our semi-vigorous option resisting woolly aphid & allowing the tree to grow to around 4-5 metres (12-15ft) in height.

M27 is our swarming option that will produce an apple tree about 2 metres (5-6 ft) in height. These would be possible to grow in large deep pots but staking is essential.

PEARS

We found the dwarfing rootstock unreliable and so currently we only offer a semi-vigorous option for pears and that is called Quince A. This will produce a tree approximately 4-6 metres (12-18ft) in height.

CHERRIES

The semi-vigorous rootstock is called ‘Colt’ and will ultimately grow to 5-6.5 metres in height (15-20ft).

The dwarfing rootstock is called ‘Gisela’ and ideal for patio pots as it will only grow to 2.5-3 metres (8-9 ft).

PLUMS & DAMSONS

St Julien A is the semi-vigorous option we use and will grow to 4-5 metres (12-15ft) in height.

Pixy is the most dwarfing rootstock and will keep a tree to about 2.5-3.5 metres (8-10ft). Trees will require permanent staking.

If you are buying your fruit tree from a reputable nursery such as ourselves, the name of the rootstock should always be given along with the variety. Always check the label to ensure your tree won’t be too big for your garden.

On our next blog we will discuss fruit tree shapes. 

Taking New Fish Home

If you are new to fish keeping, having spent time preparing your pond and aquarium you want to ensure your fish get to their new home is a peaceful manner. This is easy when you follow our simple guide to taking new fish home.

We will give you some tips when you buy your fish from us and put them in suitable packaging to minimise any stress. When you get home, float the transport bag in the pond or aquarium for 20 minutes. This makes the water temperature in the transport bag the same temperature as the water in your pond or aquarium.

Next, open the transport bag and roll down the sides so the bag still floats. Add approximately one cup of your aquarium water to the transport bag, then leave it to float for a further 10 minutes. This adjusts the chemistry of the water in the transport bag, so it is of a similar level to the water chemistry in your pond or aquarium. This helps reduce stress on your new fish.

By now your fish will have been floating in their bag for half an hour and you can now carefully empty the fish into your pond or aquarium. Most newly introduced fish will go and hide and are unlikely to feed for the first 12 hours. We advise keeping an eye on new fish for the first couple of days, just to make sure that they settled into their new home and are feeding correctly.

There are several products that you can use to acclimate your fish to their new water, ask our staff what they would recommend.

If you have any concerns with the fish you buy from us please call our aquatics team as soon as possible and they will offer some advice. They can be contacted on 01392 876281.


Kissing It Better

St Bridget Nurseries was pleased to support the charity Kissing It Better. 

Kissing it Better is about sharing simple healthcare ideas. It is also about harnessing the energy of the most dynamic groups in a local community and inviting them to use their specialist skills to make a difference to the care of patients and their carers within hospitals and care homes.Kissing It Better Charity garden               Jack Simpson Care Home by Kissing It Better

The project in Exeter involved students helping residents to brighten up their outdoor space and create a raised bed that the residents could garden themselves. The project took place at the Jack Simpson care home.

Exeter co-ordinator Lou Mason write to tell us how the project went;

“This raised bed has brought so much pleasure, conversation and activity to Jack Simpson care home. A few of the residents have been bickering over who waters it! It’s just wonderful that they have engaged with the project so well. The residents, school students and I have had such a happy and fun time working on this together. Thank you so much once again for being part of this project and generously donating the soil and perennials”.

Here are some pictures of what they have achieved.

Sensory Garden – Sight

For those of us lucky to have good eye sight we really should enjoy the rainbow of colours that nature provides us for our gardens. Working with our charity of the year, Devon In Sight, we really are learning just how valuable our senses are and how to maximise the use of the senses we have. When it comes to creating a sensory garden to appeal to our sense of sight, it really is colour all the way and not just for humans – wildlife too is attracted to bold bright colours.

To really bring your garden to life apply some ‘interior design’ tips. The colour wheel shows how primary colours (red, yellow and blue) can be mixed to create secondary colours (orange, purple and green)  and even tertiary colours (a primary mixed with a secondary)! Whilst the ins and outs of the theory are not required here the basic design principle does. Colours opposite each other on the wheel contrast and therefore compliment each other. So put yellow flowers near vibrant purples and blues next to striking oranges.

The colour Wheel

Alternatively go with a harmonious scheme by picking three colours next to each other. As many plants are largely green, blue, green and yellow is a safe colour scheme option.

In addition to success with colour, think about colour all year round. If a plant is called an evergreen it will hold its leaves throughout the year (whereas deciduous plants loose their leaves in winter). Some plants actually look better in winter. Dogwood (Cornus) have amazing stem colour that look like fireworks in the late autumn.

Once you’ve splashed some colour in the garden don’t forget to enjoy it – maybe paint a picture or take a photo of your garden or cut colourful flowers for a floral arrangement. Enjoy your senses, enjoy your garden.

School visit

Last week we welcomed some very important people to St Bridget Nurseries on a school visit.

Year one from St Peter’s School in Lympstone came on a school visit to see behind the scenes and discover how we grow plants as part of their science work. The pupils included our fifth generation Caitlin whose great-great-grandparents founded St Bridget’s 90 years ago!

The pupils were so knowledgeable at what a plant needs to grow and how to grow plants from seed that we taught them how to take plants from cuttings. Every pupil had a go and took home a couple of plants for their window sill. One plant was the popularly named Sedum Dragon’s Blood (no dragon was harmed in the propagation of these plants – honest)!

As it was a hot day we ventured through the container department outdoors to see some young plants being potted on. Both Tony and Gary on the nursery gave demonstrations with Caitlin’s mum Tammy leading the group around.

The year group went away very excited and we just hope they stay green-fingered as their was clearly some budding horticulturalists in the making!